Getting This Site Up and Running
I built this site to learn how to use S3, CloudFront, CodeCommit, CodeBuild, and CodePipeline to deploy a static website. I know there are many other sites detailing the same process, so I’m not aiming to cover every detail; just to provide a reasonable overview of the process. I’m using the very nice Jekyll to convert markdown (kramdown specifically) to HTML.
I do plan to go through this whole process again using CloudFormation, and possibly using the Ruby as well.
Step 1
Register a domain, if you haven’t already. Domain registration is beyond the scope of this post, but Amazon does offer it as part of their Route 53 service.
Step 2 (Optional)
Make AWS DNS authoritative for your domain. AWS must be authoritative if you want to use CloudFront or S3 static website hosting for your domain apex. If you’re not using the domain apex, authoritative DNS can be hosted anywhere, and you can use a CNAME to point users to CloudFront or S3.
Step 3
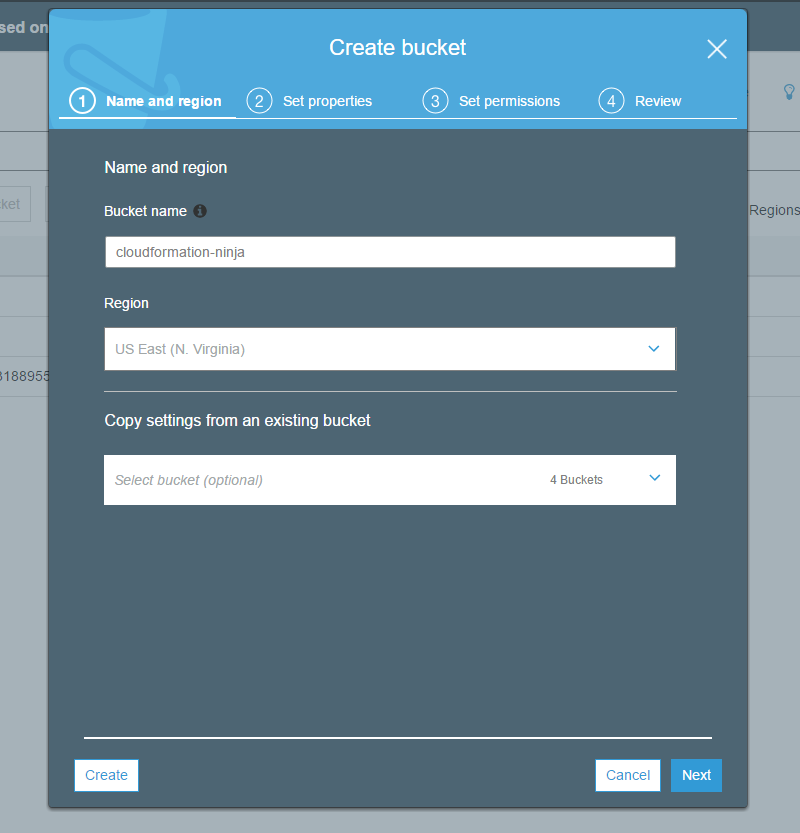
Create an S3 bucket to hold your website’s content. You can name it anything you want, but it’s convenient to use the name of your website, like cloudformation.ninja. Remember that S3 bucket names must be unique across all AWS customers and regions.
Note: If you want to host the website on S3 directly without using CloudFront, the bucket name must be the same as your domain name. So in my case, I would have to use cloudformation.ninja, rather than cloudformation-ninja. I intend to use CloudFront though, so I can use any name I want.
To create the bucket, go to the S3 console, click New Bucket, and enter the name you’d like to use for your bucket. Select a region (the “default” region for most AWS things is us-east-1). Note that different regions have different pricing both for bandwidth and for storage.
Step 4 (Optional)
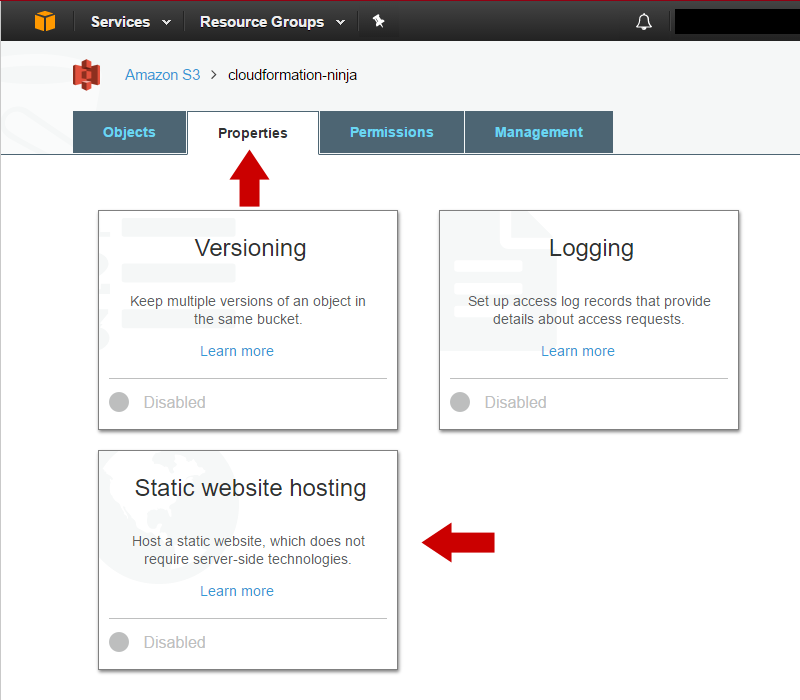
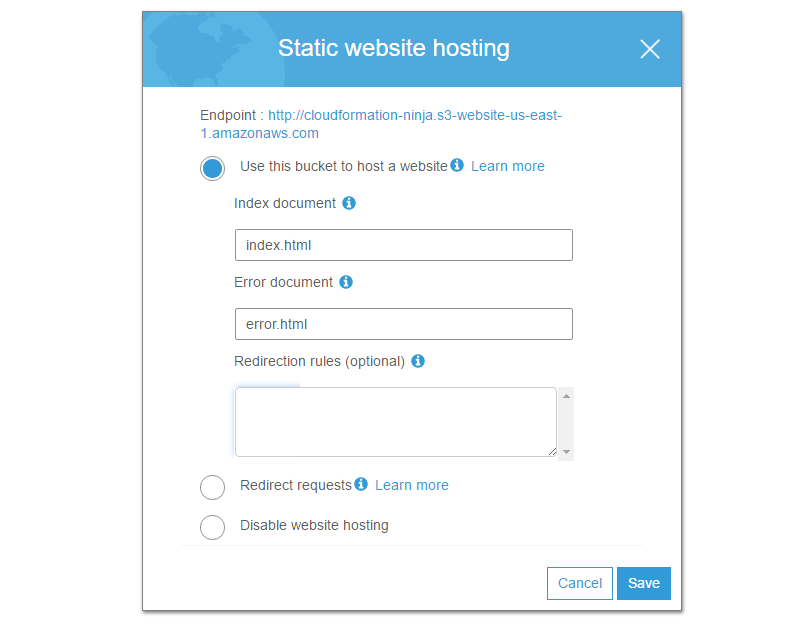
Enable static website hosting on your S3 bucket. This is not strictly necessary, but you get some niceties like default documents in subdirectories, the ability to do rule-based redirection, etc. If you do not enable static content hosting for your S3 bucket, you’ll still be able to host the website with CloudFront as your front-end, but you will lose the features just mentioned. to do this, go to your Se bucket, select the Properties tab, and click Static website hosting. Then select Use this bucket to host a website.
Once you have selected Use this bucket to host a website, you may specify default documents. If you do not specify a default document, users who go to http://yoursite/ (without index.html) will get an error.
Step 5 (Optional)
Enable public access to your static website. This is necessary if you want CloudFront to take advantage of redirection, default documents, etc. for your website. You’ll want to do this via policy, so you don’t have to set ACLs on each object individually. Note that if you do this, every file in your S3 bucket will be publicly accessible, so don’t store anything sensitive there. To do this, go to your S3 bucket, select the Permissions tab, and then click Bucket Policy. The policy should look like:
{
    "Version": "2012-10-17",
    "Id": "mypolicy",
    "Statement": [
        {
            "Sid": "mystatement",
            "Effect": "Allow",
            "Principal": "*",
            "Action": [
                "s3:GetObject",
                "s3:ListBucket"
            ],
            "Resource": [
                "arn:aws:s3:::cloudformation-ninja",
                "arn:aws:s3:::cloudformation-ninja/*"
            ]
        }
    ]
}
Step 6
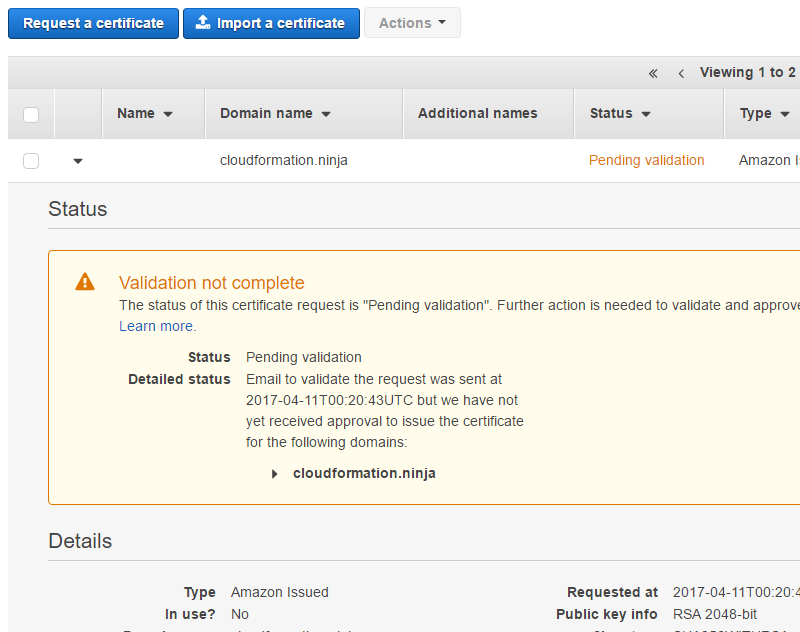
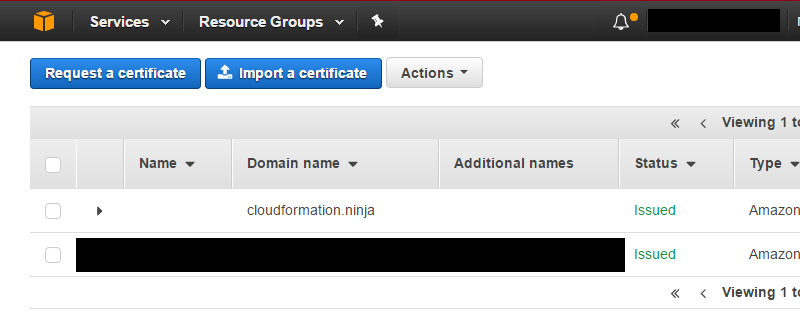
Request an SSL Certificate. The email can take a little while to come through, so start this before setting up your CloudFront distribution. When you request a certificate from AWS, they verify domain ownership by sending an email to the registered owner of the domain (which they get automatically via whois), as well as webmaster@, hostmaster@, admin@, and a few others. Make sure you will be able to receive email on one of these addresses, so you can complete the domain verification. To request your certificate, just go to Certificate Manager, click Request a certificate, and enter the domain name you’re using. You can add Subject Alternate Names as well.

Once you submit your request, you’ll be taken back to the Certificate Manager page, where you’ll see your pending request:
In my case I hadn’t bothered to set up email on this domain, so I had to quickly add MX records, verify the domain with my email provider, create the webmaster@ email address, and then resend the verification email. Verifying ownership is as simple as clicking a link in the email they send you. When you’re done, you’ll see the certificate listed as “Issued” in your certificate list:
Step 7
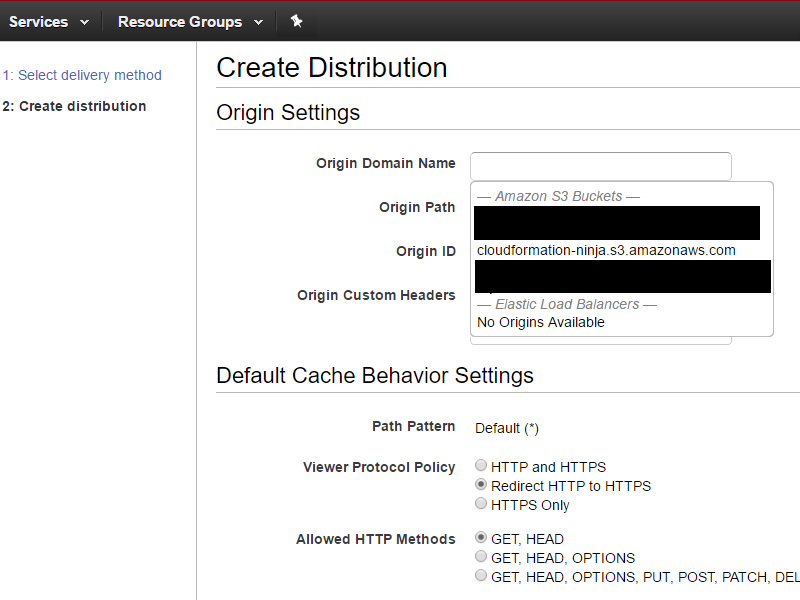
Create a CloudFront distribution for your new website. For Origin Domain Name, if you enabled static website hosting in steps 4 & 5, you have two options: select your S3 bucket from the drop-down list provided, or type in the name of your static website. If you did not enable static website hosting, you must use the S3 bucket from the drop-down list. If you choose to go the static website route, you’ll type something like bucket-name.s3-website-region.amazonaws.com. The reason I say “something like” is because for some reason it’s not consistent between regions. See the AWS website endpoints documentation for details. You can get your S3 website endpoint by going to the Static website hosting settings on your S3 bucket. The website endpoint URL is at the top of the dialog box.
I’m going to use my static website, because I want to be able to have default documents and do redirection. I will not be using the dropdown; I’ll enter cloudformation-ninja.s3-website-us-east-1.amazonaws.com for my Origin Domain Name. I’m going to leave Origin Path blank, because I will be hosting my website in the root of my bucket. I’m going to redirect my users to HTTPS, and allow only GET and HEAD requests. Although it’s not show in the screen shots, I’m setting my cache minimum and maximum to 5 and 30 seconds, respectively; that’s a good value for testing, so we don’t end up with bad versions of files cached for days.
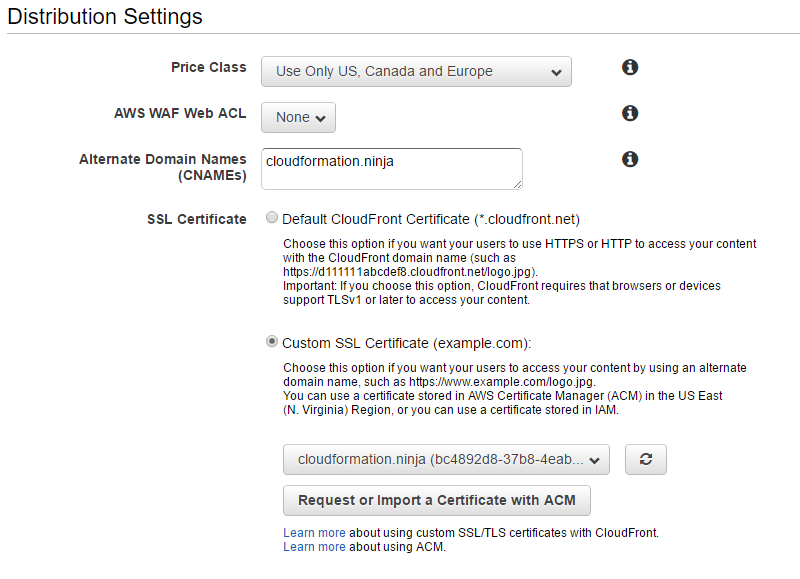
Under Distribution Settings I’m going to pick the cheapest price class (US, Canada, and Europe). This drop-down controls which edge locations are used to serve your content. Edge locations in Asia are more expensive, so I’m not going to use them. I’m going to select the certificate that I requested in step 6 from the drop-down list.
Once you save your CloudFront distribution, you’ll be taken back your CloudFront home page, and you’ll see your new distribution with a Status of In Progress. It can take several minutes for your CloudFront distribution to change to Deployed.
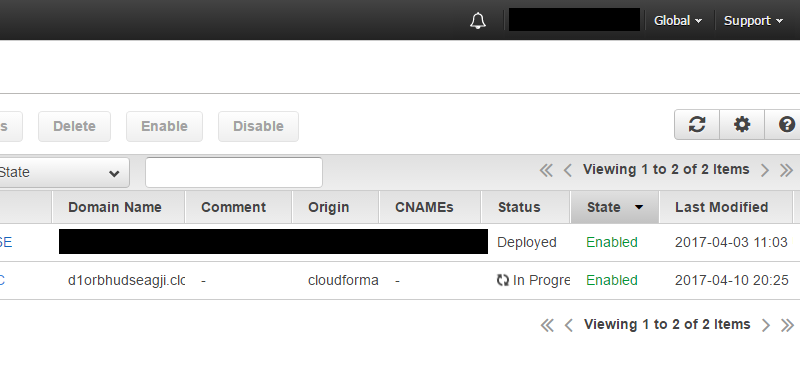
After a few minutes, you’ll see the status change to Deployed.
Step 8
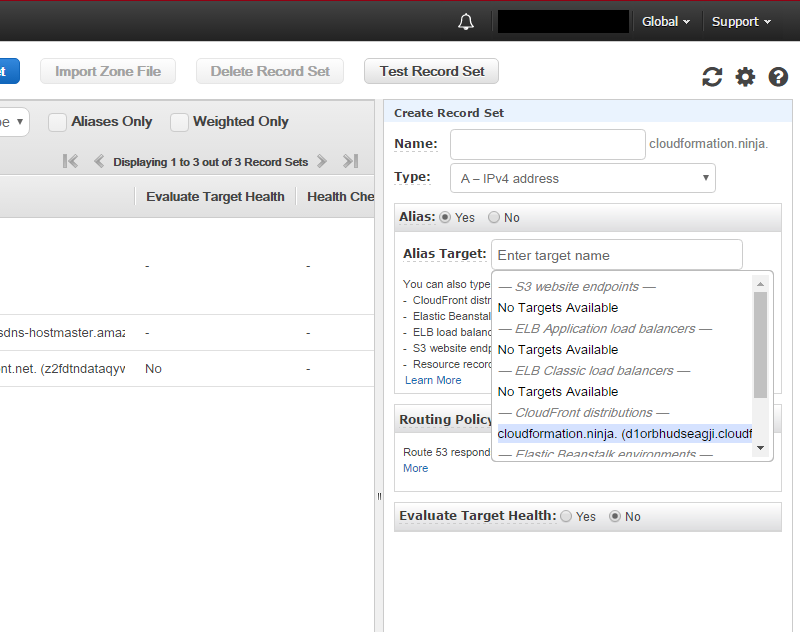
Point DNS to our CloudFront distribution. I’m using Route 53 for DNS, so it’s very easy. Just go to the DNS zone, and click Create Record Set. I’m hosting my website at the domain apex, but if you’re using “www” or some other name, enter it in the name field. I’m going to leave mine blank. Leave the type as A and select Alias: Yes. We now get a drop-down which lets us pick the CloudFront distribution that we just created. You can also just enter your CloudFront domain name (*.cloudfront.net) in the Alias Target box. Click Create and you’re done.
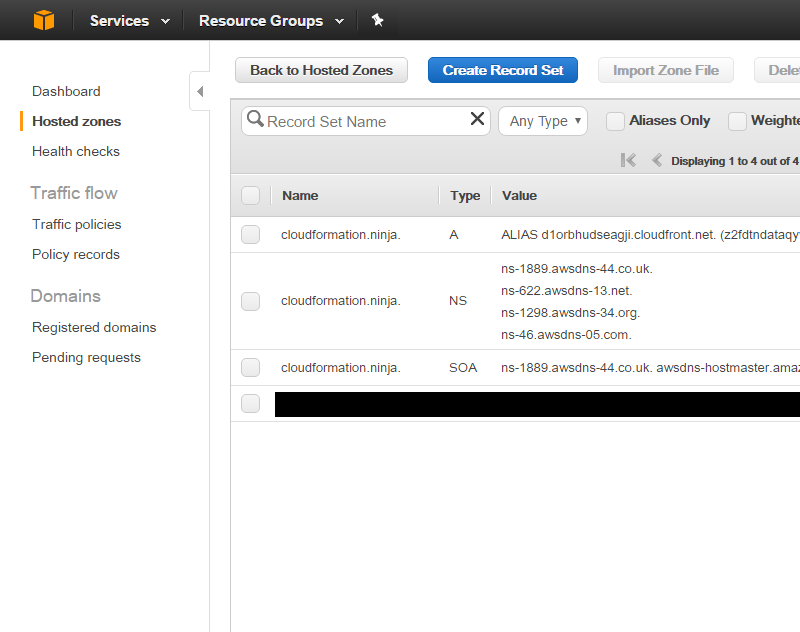
Your DNS page should now look similar to this:
It may take a minute or two for our new DNS record to replicate, but once it’s ready, if we go to our domain, we get this:
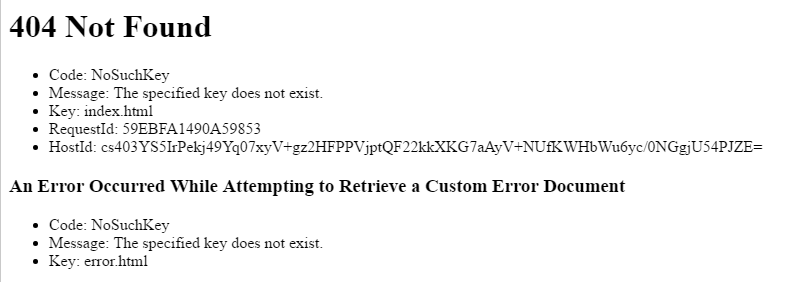
That’s because we haven’t uploaded any content to our S3 bucket yet. Simply adding an index.html file to our S3 bucket will fix that:

You’re now running with static content. If you want to edit HTML by hand, you’re good to go; you don’t need to go any further. However, if you want to use something like [Jekkyl][jekkyl] to write your content in Markdown, apply themes, etc., read on…
Step 9
Create a CodeCommit repository. I want to keep my website in git, and I don’t want to have to worry about building it, uploading it to S3 manually, etc. Fortunately, Amazon provides all the tools we need to do this in The Cloud(tm). To get started, go to the CodeCommit console, and click Create repository. Give it a name, and click Create repository again at the bottom. You’ll now be on a page with instructions on how to connect to your new repository. Follow the instructions carefully. Connecting to the git repository is probably the most complicated part of this whole process. Fortunately, the instructions Amazon provides are pretty good and easy to follow.
Once you have your credentials set up, you’ll want to clone the repo on your local machine:
$ git clone ssh://git-codecommit.us-east-1.amazonaws.com/v1/repos/cloudformation.ninja
Cloning into 'cloudformation.ninja'...
The authenticity of host 'git-codecommit.us-east-1.amazonaws.com (72.21.203.185)' can't be established.
RSA key fingerprint is SHA256:eLMY1j0DKA4uvDZcl/KgtIayZANwX6t8+8isPtotBoY.
Are you sure you want to continue connecting (yes/no)? yes
Warning: Permanently added 'git-codecommit.us-east-1.amazonaws.com,72.21.203.185' (RSA) to the list of known hosts.
warning: You appear to have cloned an empty repository.
To get started, we need something in our repository to commit. I just made an index.html with “hello world” and committed that in master. I then created a branch called publish and committed that as well. We’ll use that in a few minutes for our build. I want to use the master branch for work in progress, and automatically publish any commits made to the publish branch.
$ cd cloudformation.ninja
$ vi index.html
$ git add index.html
$ git commit -m 'Initial commit'
$ git push
$ git branch publish
$ git checkout publish
$ git push --set-upstream origin publish
Step 11
Before we create our CodeBuild and CodePipeline projects, we need to create roles for them. And before we do that, we need to create a policy for each. To create the policy, go to the IAM console, select Policies on the left, and click Create policy. On the next screen, select Create Your Own Policy. This is a policy that’s specifically for this CodeBuild project, so we’ll call it codebuild-cloudformation.ninja. The policy Document should look similar to this one:
{
    "Version": "2012-10-17",
    "Statement": [
        {
            "Sid": "CloudWatch",
            "Effect": "Allow",
            "Resource": [
                "arn:aws:logs:us-east-1:012345678901:log-group:/aws/codebuild/codebuild-cloudformation-ninja",
                "arn:aws:logs:us-east-1:012345678901:log-group:/aws/codebuild/codebuild-cloudformation-ninja:*"
            ],
            "Action": [
                "logs:CreateLogGroup",
                "logs:CreateLogStream",
                "logs:PutLogEvents"
            ]
        },
        {
            "Sid": "CodePipeline",
            "Effect": "Allow",
            "Resource": [
                "arn:aws:s3:::codepipeline-us-east-1-*"
            ],
            "Action": [
                "s3:PutObject",
                "s3:GetObject",
                "s3:GetObjectVersion"
            ]
        },
        {
            "Sid": "CodeCommit",
            "Effect": "Allow",
            "Resource": [
                "arn:aws:codecommit:us-east-1:012345678901:cloudformation.ninja"
            ],
            "Action": [
                "codecommit:GitPull"
            ]
        },
        {
            "Sid": "S3",
            "Effect": "Allow",
            "Resource": [
                "arn:aws:s3:::cloudformation-ninja",
                "arn:aws:s3:::cloudformation-ninja/*"
            ],
            "Action": [
                "s3:DeleteObject",
                "s3:GetObject",
                "s3:ListBucket",
                "s3:PutObject",
                "s3:ListObject"
            ]
        }
    ]
}
Let’s take a look at what each of those statements does:
- CloudWatch allows the build project to write its logs to CloudWatch. The 5th segment (012345678901) is your AWS account number. The final segment (codebuild-cloudformation-ninja) is the name of our build project. You’ll need to update yours accordingly.
- CodePipeline allows the build project to get and put objects in an S3 bucket that’s used by CodePipeline. This allows artifacts to be moved between them.
- CodeCommit allows the build project to get the source code from your CodeCommit repository. You’ll again need to update your account number and CodeCommit repo names accordingly.
- S3 allows the build project to actually place the generated HTML output in your S3 bucket. In order to do an “s3 sync” it needs to be able to see what’s already in the bucket.
Repeat this step for the CodePipeline policy, but we’ll use a different policy document:
{
    "Statement": [
        {
            "Action": [
                "s3:PutObject"
            ],
            "Resource": [
                "arn:aws:s3:::codepipeline*"
            ],
            "Effect": "Allow"
        },
        {
            "Action": [
                "codecommit:CancelUploadArchive",
                "codecommit:GetBranch",
                "codecommit:GetCommit",
                "codecommit:GetUploadArchiveStatus",
                "codecommit:UploadArchive"
            ],
            "Resource": "arn:aws:codecommit:us-east-1:012345678901:cloudformation.ninja",
            "Effect": "Allow"
        },
        {
            "Action": [
                "codebuild:BatchGetBuilds",
                "codebuild:StartBuild"
            ],
            "Resource": [
                "arn:aws:codebuild:us-east-1:012345678901:project/codebuild-cloudformation-ninja",
                "arn:aws:codebuild:us-east-1:012345678901:build/codebuild-cloudformation-ninja:*"
            ],
            "Effect": "Allow"
        }
    ],
    "Version": "2012-10-17"
}
This policy allows the AWS CodePipeline service to put objects into its codepipeline-related S3 buckets, interact with CodeCommit to get source code, and interact with the CodeBuild service to kick off builds and get their current status.
Step 12
Create roles for CodeBuild and CodePipeline to use. In a moment we’ll be creating a CodeBuild project, but it’s going to need a role to use. During project creation it will offer to create a role for you, but if you go that route, it grants far too much access to the role. Instead we’ll create our own with minimal permissions. Just go to the IAM console, select Roles and click Create new role. We’re going to create an AWS Service Role, but there’s no preset option for CodeBuild. So we’ll just start with an EC2 role, and modify it for CodeBuild. Click Select next to Amazon EC. On the next screen, select the role we created in the previous step. On the next screen, we name our role. I’m using codebuild-cloudformation.ninja, and I removed the (soon to be) incorrect description about allowing access to EC2 resources. Once we finish creating the role, we immediately go back in and edit the role. On the Trust Relationships tab, click Edit Trust Relationships and make sure the policy document looks like this:
{
  "Version": "2012-10-17",
  "Statement": [
    {
      "Effect": "Allow",
      "Principal": {
        "Service": "codebuild.amazonaws.com"
      },
      "Action": "sts:AssumeRole"
    }
  ]
}
This allows the AWS CodeBuild service to assume the role in our account, and the build project will be constrained by the policy we’ve applied to the role. If the policy we created in step 11 doesn’t allow the build project to do something, the build project will not be able to do it. This isn’t really important for a single build project in a personal-use AWS account, but in an enterprise account it would be important to e.g. prevent the owners of one project from overwriting artifacts belonging to a different build project.
Repeat this step for the CodePipeline role, selecting the CodePipeline policy, and using this policy document for its trust relationship:
{
  "Version": "2012-10-17",
  "Statement": [
    {
      "Effect": "Allow",
      "Principal": {
        "Service": "codepipeline.amazonaws.com"
      },
      "Action": "sts:AssumeRole"
    }
  ]
}
Step 13
Create a CodeBuild project. From the CodeBuild console, click on Create project. Give your poject a name (I’m using codebuild-cloudformation-ninja). For Source provider select AWS CodeCommit and then select the repository we created in step 9. Then we’ll pick Operating system: Ubuntu; Runtime: Ruby; Version: aws/codebuild/ruby:2.3.1; Build specification: Use the buildspec.yml.... In the Artifacts section, we’ll ultimately want to select No artifacts. But, the CodePipeline project we’ll create in the next step requries that the build project have artifacts. So, select Amazon S3, pick any name you want, and for Bucket name select the S3 bucket we created previously. For service role, pick Choose an existing service role and enter the name of the role we created in step 12. Mine is codebuild-cloudformation.ninja. Uncheck the Allow AWS CodeBuild to modify this service role... checkbox, or it will grant additional unnecessary permissions to the role.
Step 14
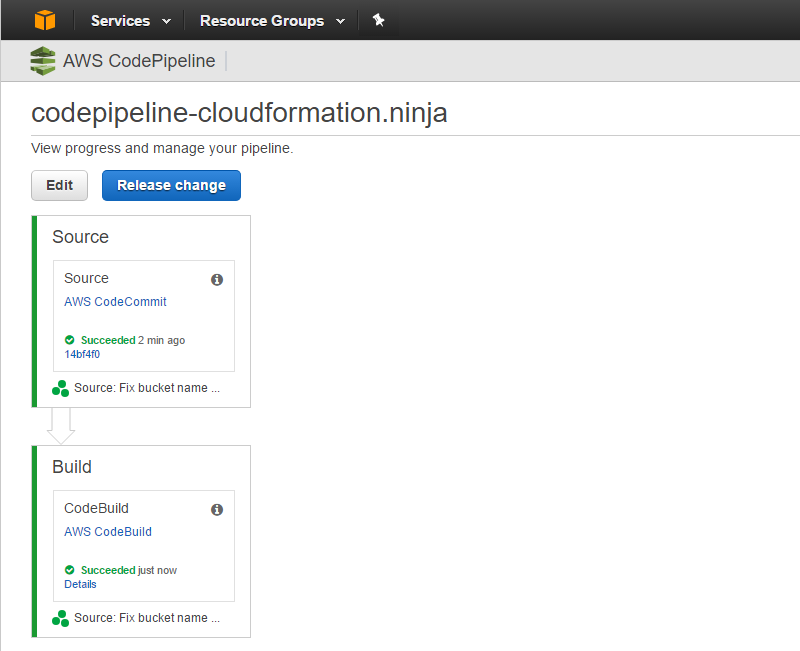
Create a CodePipeline project. From the CodePipeline console, click Create pipeline. Give your pipeline a name, click Next step. For Source provider, select AWS CodeCommit and then the repository we created previously. For Branch name, select publish. On the next page, select AWS CodeBuild as the Build provider, and Select an existing build project. When you get to the Deploy page, select No Deployment. (We’re going to deploy right from our CodeBuild project, so CodeDeploy doesn’t need to do it). Finally, on the AWS Service Role page, select the role we created in step 12.
Step 15
Disable building in the CodeBuild project. Go back to your CodeBuild project, edit it, and select Artifacts type: No artifacts.
Step 16
In order for CodeBuild to work, we need to provide a buildspec.yml file in the root of our project. Place this file in the directory where you cloned the CodeCommit git repository in step 9. Here’s what mine looks like; you’ll of course need to change the S3 bucket name:
version: 0.1

phases:

  install:
    commands:
      - apt-get update -y
      - gem install jekyll
      - gem install jekyll-feed -v "~>0.9.2"

  build:
    commands:
      - jekyll build

  post_build:
    commands:
      - aws s3 sync _site s3://cloudformation-ninja --delete --exclude buildspec.yml

artifacts:
  files:
    - _site/**/*
Step 17
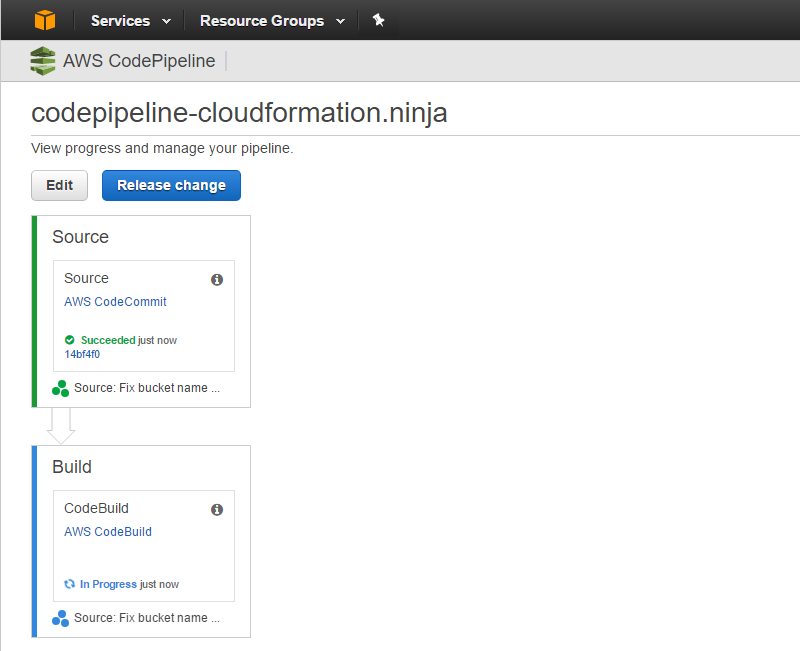
Create a Jekyll project. While still in the root of your git repository’s directory, run jekyll new .. This will create a skeleton site in the current directory. You can now git add . and git push. If you git push on your publish branch, you should see your CodePipeline project start running within about 30 seconds, and ultimately it should turn green:
And we’re done.